Showing posts with label the DIY details. Show all posts

Tuesday, January 8, 2013

Let's talk about crafts, baby

Let's talk about you [Hive] and me, let's talk about the [not] good things and [definitely] all the bad things that may be*... I would keep going but really this isn't working out as I hoped since I have to keep adding words. ;) I think you get my point though, hive. Today, we're veering into Crazyland; aka: the world in which Miss Otter thinks she can conquer a craft.

I make the comparison here to Alice in the meadow, right before she sees the white rabbit. In a world of my own, I'd be able to do crafts and they'd be Pinterest worthy - of course - and they'd be beautiful and perfect (or at least close to it) and that would be a wonderland.

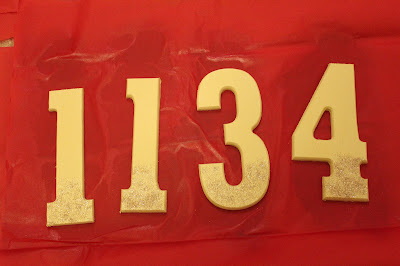
Before you scroll down, you must look at the inspiration photos I shared. So now after seeing the inspiration photos, I give you these. The table numbers. If they're even worthy of being called table numbers, given the outcome.

After taking these first few photos, I realized that the red paper I had used to modge podge the numbers on might make it difficult to judge the quality of the numbers.
These two still aren't quite the right color of paint, but I think you get the idea. Giant craft fail.

What was your worst craft fail? (Make me feel better please!?)

* For those of you who guessed that I was referencing Pitch Perfect when I said hard pass, you were right! I was also watching it while "crafting," hence my lame introduction.

Friday, November 9, 2012

The Otter Invitations: Design Time

So if you'll remember where we left off, I had found a few bits and pieces to incorporate into our invitations, but nothing that I was completely in love with. With that in mind, I ventured on over to Pinterest, where I had been collecting ideas for... a really long time.

And just like that - there it was. The invitations that we would buy! They were unique, they had the wrap around labels, and while there were a few things, I didn't love, I thought I could work with designer to change it up a little to further customize them for us.

Photo via Impressed Inc. / Invitation design by a friend of the bride

But alas, these invitations weren't for sale. I even commented on the post, asking if the designer had an Etsy store or some other means of comment so that we could talk about these invitations. I wasn't the only commenter - many others felt the same way about these invitations, but as recently as a few weeks ago, there was no update made regarding the mystery designer behind the invitations.

So what's a girl to do!? Create our own, of course. When MOH Cubbie generously offered to do the design work for us, for free (!), I took her up on it and about an hour later we had a preliminary design. This also gave us the opportunity to change the things that I didn't love, like the "I do" "Me too" bubbles. Actually saying "I do" is a big deal to me, so I wanted that to be reflected on our invitations. Cubbie also made a graphic for us, the interlocked anchors with a heart, so we could incorporate those into our paper items. I was pretty set on having the black invitations with hot pink writing, like our almost-color palette for the wedding.

Cubbie and I chatted for about an hour, and then she sent this proof on over to me:

Personal image / Design by MOH Cubbie

Okay... so that looks very similar to what we were going for, but along with this, Cubbie had sent her own version of the invitation which customized it even further. A completely different color scheme, as well as some design changes that Mr. O especially fell in love with. Now, while I can't reveal the invitations until they're actually sent, let's just say that we didn't end up going with the proof you see here... ;)

Any guesses about how our invites may turn out?

Wednesday, November 7, 2012

The Otter Invitations: The Inspiration

After sending our STDs, it was time to move on to the invitations. Early on, I had a few favorite bits and pieces from invitations but nothing that felt just right to purchase (or even create) as a full set. Everything was beautiful, but just not quite "us."

Photo via The Knot / Photography by Allyson Magda Photography / Invitation by Hello!Lucky
I love that these invitations featured the font Strangelove (a favorite font of mine) and the wrap around mailing labels.

Photo via Style Unveiled / Photography by KIM+PHIL Photography / Invitation by Paper Bloom
I love the RSVP cards from this invitation set! I would much rather send something fun like this (and leave space for a little note from friends and family) than send the "yes" or "no" options.

Regatta Wedding Invitations by Oscar & Emma
Regatta Wedding Invitations by Oscar & Emma From Minted Paper Goods via Lover.ly
This invitation grabbed my attention because of the anchor, something that I love and really wanted to incorporate into our wedding - especially the paper goods.

So while that left us with a lot of inspiration and bits and pieces to use, it really didn't leave us with a set idea of okay, let's work off of this design. Off to Pinterest I went, where I hoped to find something that would allow me to incorporate all these different pieces into one invitation. 

I did find something there... but first, what do you think of the few items we planned to incorporate?

Tuesday, October 9, 2012

GLITTER!

So when I talked about our colors, a lot of you were wondering how I would incorporate the gold glitter into our otherwise soft-colored color palate.

Well, at first, I didn't know! I just really love glitter, so I wanted to incorporate it in some way. Then, I started looking specifically for weddings that had the same color scheme and I happened to come across a couple gems, which gave me a better feel for how we could incorporate glitter without getting it all over our guests (a point that Mr. Otter made early on, because he isn't a huge glitter fan like me!).

The first idea (and probably my favorite, thus far) was to incorporate it in some of our detail shots. I love this shot that clearly features the flowers, but uses gold glitter fabric as the backdrop. And - points for no glitter on guests!

Image via Bows and Arrows / Photo by N Barrett Photography

The second idea I found was from the same wedding - incorporating the glitter into the signage! While I haven't quite determined what kind of signage we're going to need, I do know that we're going to be featuring photos of those who have passed and can't be with us, so perhaps a gold glitter heart could accent the photos on that table.

Image via Bows and Arrows / Photo by N Barrett Photography

My last idea would be a bit of a DIY project. Have you ever heard of the "mermaid manicure"? Take the concept of the mermaid manicure accent nail (a little glitter on the end of the nail, just a small sprinkle) and apply it to these beautiful gold table numbers! This way - I incorporate the gold in a very subtle way that also won't get all over our guests.

Image courtesy of Cupcakes and Cashmere / See the little sparkle of glitter?

Image via Style Me Pretty / Photo by Lisa Lefkowitz / So now with these gold table numbers, add a tiny dash of gold glitter on the bottom - that's my vision!

What do you think? Out of these options, which way would be the best to incorporate the gold glitter without going overboard?

Friday, June 15, 2012

My very first wedding DIY... Well...

Hive... I come here with my head hanging in shame, and okay... maybe I'm also blushing a little about the horrible fail that my was my first DIY wedding project. It's so bad that I don't even have any photos to share... And I'm not exaggerating, it was that bad.

So... here it goes. If you're on Pinterest, or browsing any wedding blogs in the whole wide world, then you've seen these "Will you be my maid" boxes that the fabulous Bethany from Rinse. Repeat. made.

Image via Rinse. Repeat. / And the lovely Bethany gives instructions on how to make these gorgeous Be My Maid? boxes!

Anyway, when I saw these boxes, I was head over heels. Not only are the boxes themselves wonderful keepsakes for the girls to enjoy, but they're also a great way to communicate all the important details to the girls and give them a little gift.

Now, when I ventured out to do this project, I had already told two of my girls that they would be in the wedding. In fact, I asked one over the phone and got caged into a box by the other and had to give in and tell her she was in the wedding - let me just admit it now, I'm bad at keeping secrets.

So anyway, setting out to do this project, I went to my local Hobby Lobby and started hunting for boxes. And found out that I wasn't going to get wooden boxes because there were only TWO of the variety I wanted. Now I'm really bad at math, but TWO boxes and FOUR bridesmaids? Nope, not gonna work. Since the whole thing was a DIY project anyway, I decided to go with cardboard boxes. Victorious in my quest for supplies, I marched out of Hobby Lobby and went home to start painting them right away.

And that's when things went horribly awry. See, what I learned the hard way is that cardboard boxes are definitely not the same as wooden boxes and they didn't soak up the paint the way I wanted them to. They also showed each and every brush stroke. Great. As I sat on the floor angry and bitter about my failed DIY (because I was too lazy to go across town to Michael's - I admit it) Mr. Otter came in and asked what the problem with the boxes was. He laughed but ultimately agreed with me that this project was just a horrible fail... and was nice enough to throw away the now horrendously painted boxes.

Thankfully, I was able to return the rest of my supplies but I was at an impasse. What to get these girls, all four of which are very different, both in personalities and ages? Well... I ended up taking the easy way out and getting them necklaces from Etsy.

Image courtesy of Etsy seller, moncadeau

I know a lot of people intend to DIY a lot of things for their wedding, but I'm not sure that after this horrible fail, I can be one of them. What about you? After one DIY fail, would you try again or just move on?